Every marketing automation should have a clear goal in mind.
Even though we love email, we know you don’t just send emails to your customers for pure fun.
You’re aiming to spark action from the reader, whether it’s clicking a link, making a purchase, or signing up for a newsletter.
Sometimes you need to nurture them through an entire email series. But other times, they act fairly quickly. This is where the Goal Action comes into play.
A Goal action will jump a contact to another action in your automation once that contact meets certain conditions.
With goals, it doesn’t matter how many steps come before it in the automation. As soon as a contact meets a Goal’s condition, that contact is pulled from wherever it is in the automation to the Goal.
For example, let’s say you have an email campaign series targeting contacts you hope to get enrolled in a new course you’re offering. You plan to send four emails promoting the course, but once a contact enrolls, you do not want them to receive the rest of the emails in the series.
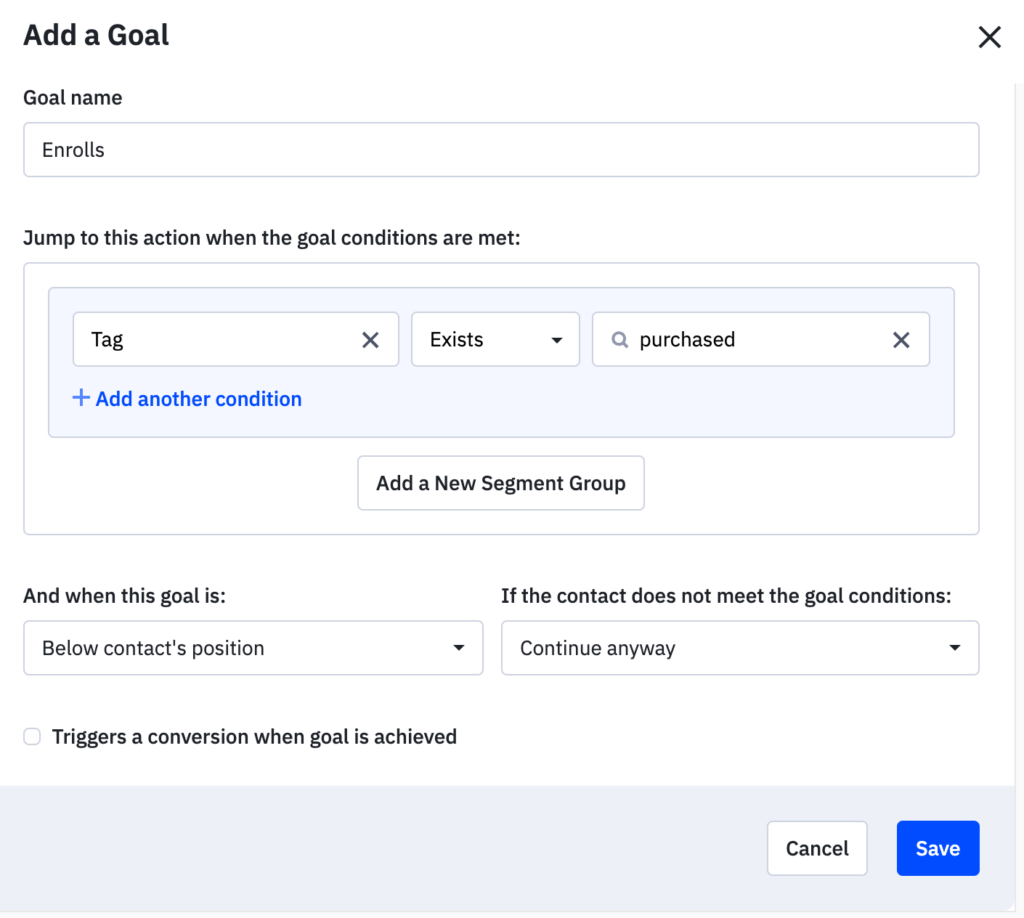
In this instance, you’ll want to configure the Goal action to cause a contact to jump from anywhere in the automation once they have the tag “purchased” (you can use a separate automation to handle the application of this tag).

Now, when a contact enrolls in your course, they’ll skip the rest of the email steps and jump right to the Goal action in the automation.
![]() Note: If adding the Goal action to an “Active” automation, make sure to set the automation to “Inactive” first. Once you’re done editing the automation, set it back to “Active” so contacts can continue to enter your automation and proceed through your workflow.
Note: If adding the Goal action to an “Active” automation, make sure to set the automation to “Inactive” first. Once you’re done editing the automation, set it back to “Active” so contacts can continue to enter your automation and proceed through your workflow.
You can learn more about this process by watching this video:
Or, walk through it with us in today’s Task of the Day.
Day 19 - Task of the Day:
Set up a Goal action to an automation:
- Click Automations on the left menu, then click “Edit” for the automation you want to edit.
- Click “Conditions and Workflow” and drag the “Goal” action to your automation.
- The Goal action modal will appear. Type the name of the Goal into the Name field provided. As a best practice, we recommend choosing a name that describes the Goal’s desired outcome.
- Use the segment builder to set your Goal conditions.
- Click the “And when this goal is” dropdown and select either “Below the contact’s position” or “Anywhere.”
- Click the “If the contact does not meet goal conditions” dropdown and choose an option. This determines the action contacts will take when encountering this action in your automation but do not meet the goal conditions.
- Optional: Click the “Trigger this conversion when this goal is achieved” dropdown if you want this Goal to trigger a Conversion.
- Click the “Save” button.
